The Workfile Window
Probably the most important windows in EViews are those for workfiles. Since open workfiles contain the EViews objects that you are working with, it is the workfile window that provides you with access to all of your data. Roughly speaking, the workfile window provides you with a directory for the objects in a given workfile or workfile page. When open, the workfile window also provides you with access to tools for working with workfiles and their pages.
Workfile Directory Display
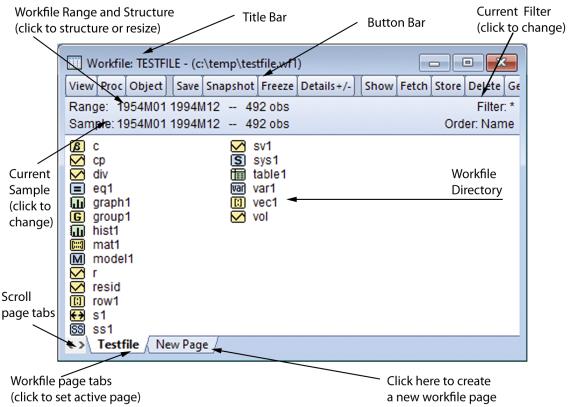
The standard workfile window view will look something like this:
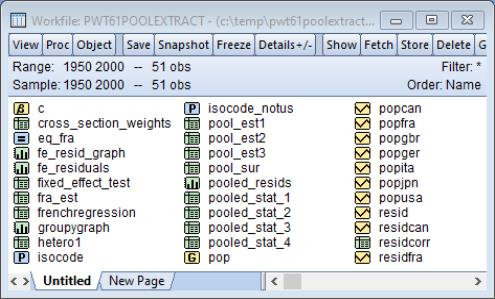
In the title bar of the workfile window you will see the “Workfile” designation followed by the workfile name. If the workfile has been saved to disk, you will see the name and the full disk path. Here, the name of the workfile is “TESTFILE”, and it is located in the “c:\eviews\data” directory on disk. If the workfile has not been saved, it will be designated “UNTITLED”.
Just below the titlebar is a button bar that provides you with easy access to useful workfile operations. Note that the buttons are simply shortcuts to items that may be accessed from the main EViews menu. For example, the clicking on the button is equivalent to selecting from the main menu.
Below the toolbar are two lines of status information where EViews displays the range (and optionally, the structure) of the workfile, the current sample of the workfile (the range of observations that are to be used in calculations and statistical operations), the display filter (rule used in choosing a subset of objects to display in the workfile window), and an indicator for the order in which the objects in the workfile are displayed. Here we see that the objects are currently in alphabetical order. You may change the range, sample, and filter by double clicking on these labels and entering the relevant information in the dialog boxes.
Lastly, in the main portion of the window, you will see the contents of your workfile page in the workfile directory. In normal display mode, all named objects are listed in the directory, sorted by name, with an icon showing the object type. The different types of objects and their icons are described in detail in
“Object Types”. You may also show a subset of the objects in your workfile page, as described below in
“Filtering the Workfile Display”, or change the display order as outlined in
You may choose in the workfile toolbar to specify whether EViews should use upper or lower case letters when it displays the workfile directory. The default is lower case.
It is worth keeping in mind that the workfile window is a specific example of an object window. Object windows are discussed in
“The Object Window”.
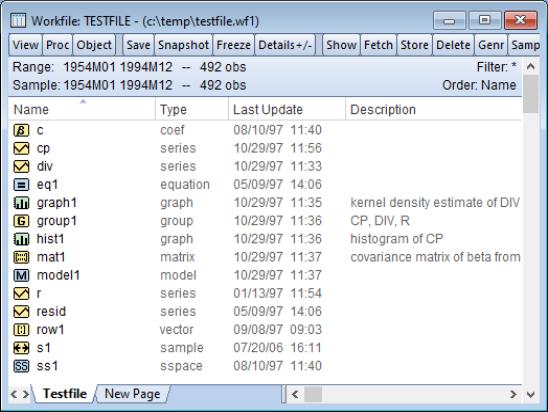
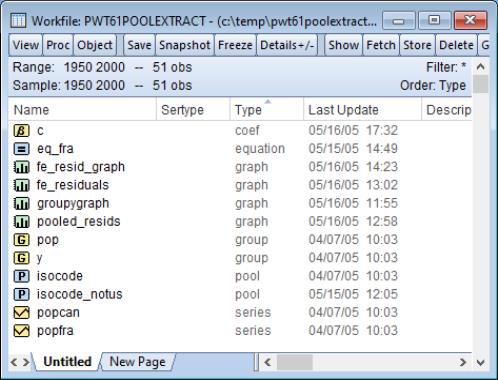
Workfile Details Display
You may change the default workfile display to show additional information about your objects. If you select , or click on the button on the toolbar,EViews will toggle between the standard workfile display format, and a display which provides additional information drawn from the label of each object. (See
“Adding Custom Attributes in the Label View” for details on modifying label information in your objects.)
Working with Built-in Attributes
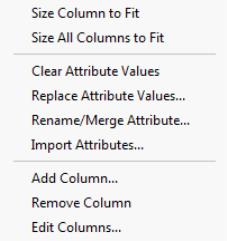
From this view, you can sort the objects in the workfile using the values in any of the columns. Simply click on a column header to sort by that column, and to alternate between an ascending or descending sort order. A small gray triangle pointing up indicates an ascending sort, while a triangle pointing down indicates a descending sort.
With the exception of the NAME column, which must remain in the first column, you may reorder the columns by dragging each to your desired location. The columns can be resized by placing the cursor over the gray dividing line between column headers (the cursor will switch to a sizing image) and dragging to the left or right.
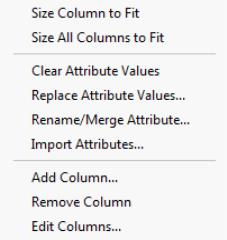
To size a column to the width of its longest text string, right-click on the column header and select from the menu that appears. If you’d like to size all the columns in the workfile view to accommodate the text within each, select from the right-click menu.
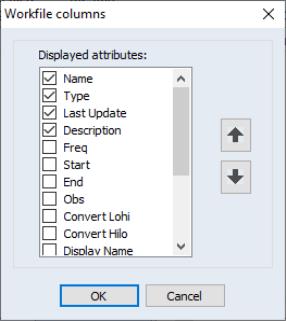
By default, the view shows NAME, LAST UPDATE, and DESCRIPTION for each object. You can customize this view to include any of the attributes in your objects. Right-click on the column header and select from the menu. You will see a dialog displaying all available attributes in your workfile. These items are a collection of the individual label attributes within each object. While each object in the workfile may not have the same attributes, the dialog presents all possible attributes that can be displayed as columns in the workfile view.
You will notice that initially, NAME, LAST UPDATE, and DESCRIPTION are checked, indicating they are visible in the workfile view. To add additional columns, click on the checkbox in front of the attribute you wish to see. You can reorder the columns from within the dialog by selecting an attribute and clicking the up and down arrows on the right-hand side. Again, the NAME column is locked in the first position and cannot be moved or hidden. The attribute columns will be displayed in the workfile in the order you specify after you click in the dialog.
All available information for each attribute will be displayed. However, some objects may not contain label information for an attribute, in which case you will see a blank cell in the attribute column.
Adding columns to the workfile view provides you with a convenient way to look at information across the objects in your workfile. Instead of opening each object to view its observation count, for instance, you can add OBS to the workfile and look at the number of non-NA observations in every series in your workfile at once. Additionally, there are many more attributes available via the dialog than are visible in the view of an object. For instance, you can view the and dates of your objects in the workfile view by adding them as columns.
The sort function provides a method for grouping objects in your workfile. For example, you could sort by the LAST UPDATE column to view objects that have been created or modified recently, or by the SOURCE column to group objects from a particular data source.
The rules EViews uses to sort the workfile window are intuitive, but it is worth mentioning a couple of them. First, empty values are placed at the end of the list, whether the column is sorted in ascending or descending order. Additionally, if you add the FREQ attribute to display the frequency of each object and sort by this column, you will see that frequency is sorted from low to high (or high to low), not by the letter representation in the column. (You could have multiple frequencies if you have a series link to another page of a different frequency, for instance.)
At the end of the list in the default dialog, you will see the items “Deptype” and “Depspec”. These are the dependency type and dependency spec, respectively. The dependency type provides information about the source of the data, when appropriate. It may be empty or one of three values: “dblink”, “pagelink”, or “formula”. The dependency spec gives additional information about the dependency.
For instance, if a series is based on a formula, its dependency type would be “formula” and its dependency spec might be “log(x)”. If a series is a link from another workfile page, its dependency type would be “pagelink”, and its dependency spec might provide information about its source workfile page. Finally, a series that has been pasted from a database would have the dependency type “dblink”, and the source database name and series could be stored in the dependency spec.
To remove a column from view, unselect the checkbox in front of the item in the dialog. Alternately, right-click on the column you wish to remove, and select from the menu.
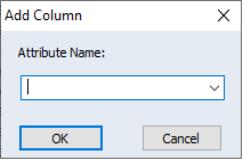
If you’d like to add a column without going through the dialog, right-click on any column header and choose . The dialog will appear, into which you may enter the name of the attribute you’d like to add as a column in the workfile view. This field is not case sensitive, but otherwise must match the attribute name exactly. You can also click the arrow on the dropdown menu to select from a list of all available attributes. (This is the same list that is used to fill the dialog.)
Note that , , and modify the appearance of the workfile view. They do not add or change attributes within the objects. As such, you can add a column that doesn’t exist as an attribute for any object in your workfile. EViews will display the column anyway, showing all blank values.
You may customize each workfile page independently, choosing to display different columns and grouping your objects differently according to the sort order.
When you save the workfile, the columns you have chosen to show will be stored, along with their widths, the display order and the sort method. Your settings will be saved whether the workfile is currently in view or not. You may also freeze the workfile window in this view, providing you with a detailed table that can be copied or saved. To save the table, right-click in the table and select .
Adding Your Own Label Attributes
While EViews provides a variety of attributes by default, you may like to add your own. You can add them directly to individual objects, or globally from the workfile window. To learn more about adding custom attributes to individual objects, which will then appear in the list of attributes for the workfile view, see
“Adding Custom Attributes in the Label View”. Alternately, to add attributes to every object in the workfile, you may use the tools provided in the workfile window.
From within a column header in the workfile window, right-click to bring up the menu. We will turn our attention to the items in the middle of the menu (, , , and ). These menu items modify the actual attributes within your objects, while the items we have already discussed (, , and ) simply change the appearance of the workfile view.
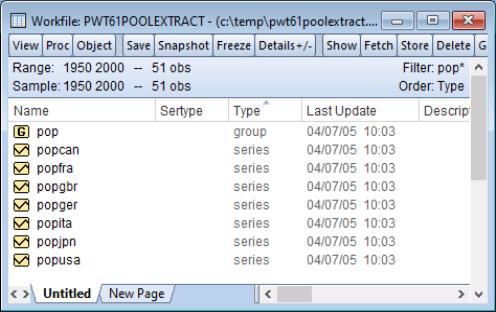
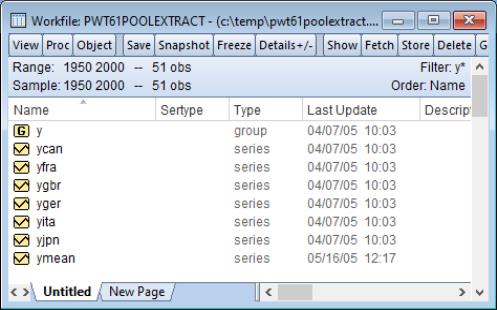
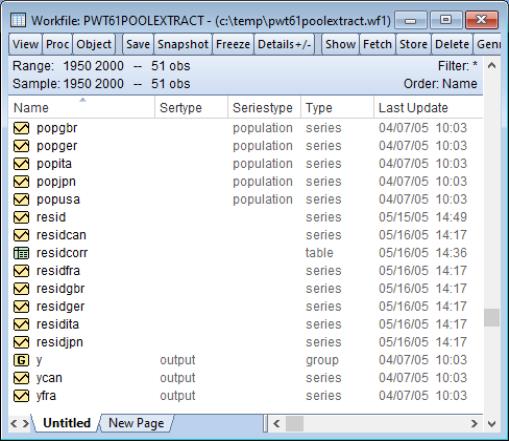
We will illustrate the use of these options with an example. Say we have a workfile containing information on the population and output for a number of countries, from 1950 to 2000. For each country, there is a series with population data and one with output data. The series are named such that a prefix indicates the series type (POP for population and Y for output), and the last three characters specify the country. For instance, the population series for Canada is POPCAN. We would like to flag each series, so that we can easily see which contain population data and which contain output data.
From the workfile view, we add a column named SERTYPE (select from the right-click menu, and enter “Sertype”). At this point, the attribute does not exist in any of our objects, and so the column is blank. We would like to add the attribute to the objects and populate it with information.
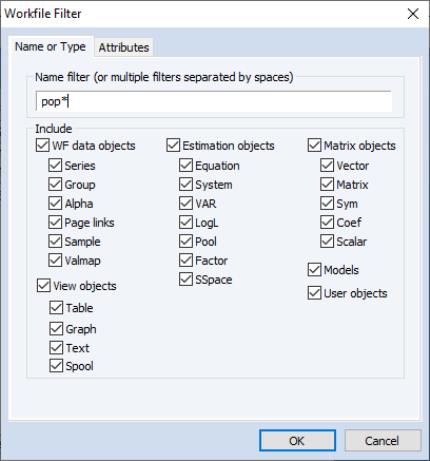
The values of an attribute can be set much easier if we first filter the workfile to show only the objects we’d like to edit. Double-click on the word in the top right-hand corner of the workfile window to bring up the dialog.
First, let’s label the series with population data. Enter “pop*” in the edit field to filter the workfile to show only objects whose name begins with the letters “pop”, and click . (See
“Filtering the Workfile Display” for more information on filtering your workfile.)
The workfile now shows only the series related to population, for each of the seven countries included in our data.
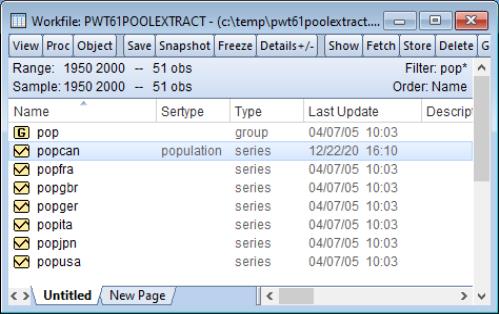
Now, we go into the label view of the series named POPCAN, add the SERTYPE attribute (see
“Adding Custom Attributes in the Label View”), and set the value to “population”. When we return to the workfile view, we will see “population” under the SERTYPE column for the POPCAN series. The other series do not have a SERTYPE attribute. You might imagine that adding the attribute and entering a value for every series could be tedious, especially if our workfile contained series for more countries. Let’s explore an easier method of globally modifying your attributes.
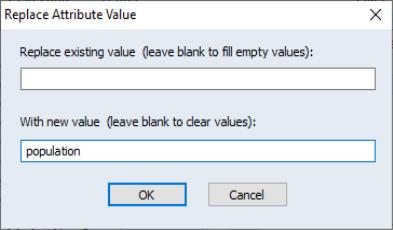
Right-click on the SERTYPE column to bring up the attribute modification dialog again, and select
This dialog combines a few operations into one, by allowing you to enter a value into one field and leave the other blank, or by entering data into both fields. In turn, you can fill empty attributes with a value, replace a specific existing value with another value, or reset attributes to blank. We will discuss each as we continue our example.
First, let’s add the SERTYPE attribute and fill it with the value “population” for the set of objects we have filtered. In the dialog, leave the first edit field blank, enter “population” in the second edit field, and click . Note that this dialog is case-sensitive. Since we brought up the dialog by right-clicking on the SERTYPE column, this operation will replace all blank values of SERTYPE with “population”, for all visible objects in the workfile. The SERTYPE attribute is new for all objects except the POPCAN series. Since the SERTYPE value is already set in this series, this operation will not modify its value. Click in the confirmation dialog to complete the process. We will see that every series in our current workfile view has been given the value “population” for its SERTYPE attribute.
Now we can add and populate the SERTYPE attribute for objects with output data. Double-click the text in the top right corner of the workfile window, bringing up the dialog again. This time, enter “y*” in the edit field to filter the workfile to show only objects beginning with “y”, or those related to output, and click .
You may now right-click on the SERTYPE column, select , and repeat the process for the second set of filtered objects. Leave the first edit field blank, enter “output” in the second edit field, and click . The SERTYPE attribute will be populated with the text “output” for all the filtered objects.
When we remove the workfile filter (open the dialog and enter “*”), we will see all our objects with the appropriate SERTYPE coding, indicating which series provide population data and which provide data about the country’s output.
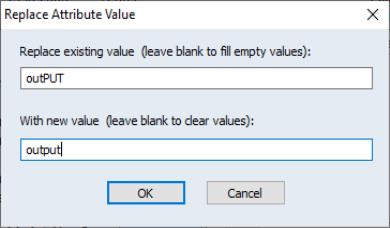
Now that we have populated all the objects, what if we notice that we typed “outPUT” instead of “output” in the case-sensitive dialog. This can easily be fixed. Bring up the dialog again, and enter “outPUT” in the field, and “output” in the field.
When you click , you will be prompted by a dialog confirming that you wish to replace all SERTYPE attributes containing the text “outPUT” with the text “output”. Click to confirm. By using the dialog, there was no need to go into each object individually; the label information was updated globally. You also didn’t need to refilter the workfile. Only attributes with the text “outPUT” were modified.
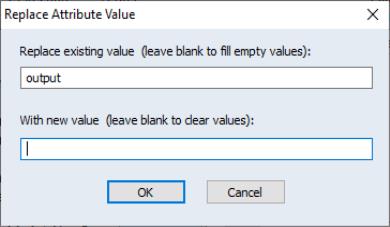
Finally, the dialog can also be used to clear specific attributes based on their value. For instance, now that all our objects related to a country’s output are coded with “output”, we could clear all SERTYPE attributes for these objects by entering “output” in the first edit field, and leaving the second edit field blank. All SERTYPE attributes with the value “output” will be removed from their objects.
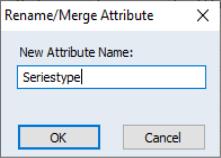
Another item in the right-click menu that can be used to edit the underlying attributes is . If you decide you would like your attribute to be named SERIESTYPE instead of SERTYPE, you may use this dialog to globally edit the attribute in all objects which are currently visible in your workfile. Right-click on the SERTYPE column, and select to bring up the dialog. Enter “Seriestype” and click . The SERTYPE attribute will be renamed SERIESTYPE in all objects currently in your workfile filter.
Say you accidentally have your workfile filter set to show only objects related to population (“pop*”) when you rename the SERTYPE attribute. When you reset the filter to show all (“*”), you will see that the column has been renamed to SERIESTYPE, and only objects with population data are showing their “population” attribute value. The series with output data still have an attribute named SERTYPE, which is not shown, as you no longer have a SERTYPE column in your workfile. If you now add back a column for the SERTYPE attribute, (select from the right-click menu, and enter “Sertype”), you will see that all series are labeled, but half of the values are in the SERTYPE attribute, and half are in the SERIESTYPE attribute. You can remedy this using the dialog.
With the filter set to all (“*”), right-click in the SERTYPE column and select . Type “Seriestype” in the edit field, then click in the dialog and for the confirmation message. Now, there will no longer be a SERTYPE attribute, and all objects contain an attribute named SERIESTYPE.
We have described a rename operation with no conflicts. When you rename an attribute to one that already exists, EViews attempts to merge the attribute values. The attribute that you right-clicked on to bring up the dialog is considered the primary attribute. First, the primary attribute will be renamed to the name you entered in the edit field. Then, in preparing to delete the conflicting attribute, EViews tries to merge the values for each object. If both attributes have values for a given object, the text of the primary attribute is retained. If one attribute is blank, then the text is preserved, whether it be from the primary or conflicting attribute. Once the values have been used to populate the renamed attribute, the conflicting attribute and the contents of its label values will be removed from all objects in the current workfile filter.
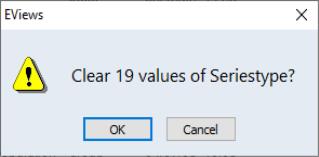
Another item in this section of the right-click menu is . This option clears the contents of an attribute and removes the attribute from every object, provided it is not one of the fundamental locked types. Again, this is actually deleting the label information and removing the attribute across the entire workfile; it is not simply modifying the column in the workfile. You will see a warning dialog before the clear operation is performed, indicating how many instances of the attribute were found.
If we want to clear the SERIESTYPE attribute in our example, select from the right-click menu while the mouse is over the SERIESTYPE column. EViews scans the workfile for objects containing the attribute SERIESTYPE, and displays the number of objects found in the warning dialog. Click to remove the label information and attribute from all the series we had labeled in our workfile.
The SERIESTYPE column will remain in the workfile view, even though the attribute does not exist in any of our current objects. This is useful if we wish to add and repopulate the attribute. Alternately, we might have had a filter on the workfile at the time the clear operation was performed, such that when we return to a full view of all objects, some will have the attribute and can display values in the column. (See
“Filtering the Workfile Display”.)
Importing Attributes
The previous example used a set of series which were named in such a way as to make workfile filtering effective. We were able to isolate the series related to population and those related to output quite easily. If your series are not named so conveniently, the feature may be a better way to create and populate your attribute.
Additionally, if you have the values of your attribute in some text format, you can setup a workfile page containing the values, and then import them into your series.
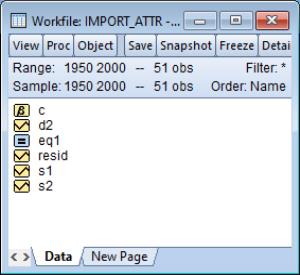
To illustrate, say we have a workfile with the series objects D2, S1, and S2 and an equation EQ1. We have received the data from different employees, and we would like to add an attribute named CREATOR to keep track of who contributed each series.
We need something to hold your attribute values and to provide information about which value relates to which series. To accomplish this and get the information into the EViews world, we use another workfile page.
Click on the tab at the bottom of the workfile window and select to bring up the dialog. It doesn’t matter what frequency you use to define the new page; dates are completely irrelevant. What you should pay attention to is the number of observations, as each observation will be used to tie an attribute value to a series. In other words, you should have at least as many observations as the number of series you wish to populate with an attribute value.
We have four objects in our current workfile page, so if we have an attribute value for each, our start and end dates should define at least four observations. The default options create a new workfile page from 1950 to 2000, matching our current workfile. While this provides more observations than necessary, we accept the default and click . (We have also renamed the page to ATTRINFO by right-clicking on the new tab after it is created.)
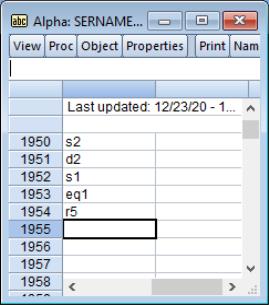
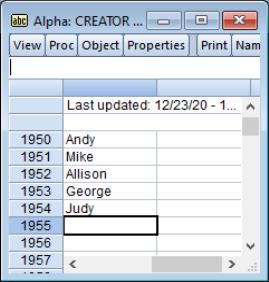
The method EViews uses to populate an attribute requires two things: the attribute values and a list of the objects to receive these values. These are each held in an alpha series. As such, we create two alpha series, named CREATOR and OBJNAME. (This can be done by typing alpha creator and alpha objname into the command window.)
The CREATOR series will hold the values for whichever objects we’d like to provide information, and it is also the name of the attribute we will be defining. The OBJNAME series indicates which objects will be receiving attribute information. The series are aligned by observation number, such that the value of CREATOR for 1950 will be assigned to the CREATOR attribute of the object specified in OBJNAME for 1950.
Here, we have filled SERNAME with a list of object names in our first workfile page. Note that R5 does not exist, but this will not cause us problems. When entering the object names, remember that copying from a workfile page copies the names of the objects. You can then paste the names directly into an alpha series to get a list of your objects.
Since we entered the object names as each employee submitted their data, they are not in any particular order. This is fine, as long as the values in CREATOR are in the same order.
We have entered names into the CREATOR series to indicate that Andy provided data for the series S2, Mike provided D2, and so on.
If you have a source from which to copy and paste your text, this is clearly the easiest method. However, even if you must enter the information manually, this importing method is still superior to opening every object’s label view to enter each value individually.
Filtering the Workfile Display
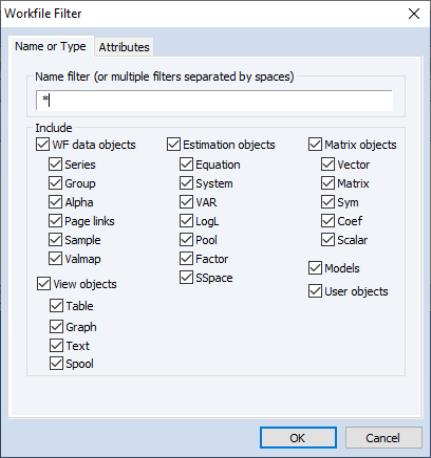
When working with workfiles containing a large number of objects, it may become difficult to locate specific objects in the workfile directory display. You can solve this problem by using the workfile display filter to instruct EViews to display only a subset of objects in the workfile window. This subset can be defined on the basis of object name as well as object type.
Select or double click on the Filter description in the workfile window. The following dialog box will appear:
There are two parts to this dialog. In the edit field (blank space) of this dialog, you may place one or several name descriptions that include the standard wildcard characters: “*” (match any number of characters) and “?” (match any single character). Below the edit field are a series of check boxes corresponding to various types of EViews objects. EViews will display only objects of the specified types whose names match those in the edit field list.
The default string is “*”, which will display all objects of the specified types. However, if you enter the string:
x*
only objects with names beginning with X will be displayed in the workfile window. Entering:
x?y
displays all objects that begin with the letter X, followed by any single character and then ending with the letter Y. If you enter:
x* y* *z
all objects with names beginning with X or Y and all objects with names ending in Z will be displayed. Similarly, the more complicated expression:
??y* *z*
tells EViews to display all objects that begin with any two characters followed by a Y and any or no characters, and all objects that contain the letter Z. Wildcards may also be used in more general settings—a complete description of the use of wildcards in EViews is provided in
Appendix A. “Wildcards” .
When you specify a display filter, the description in the workfile window changes to reflect your request. EViews always displays the current string used in matching names. Additionally, if you have chosen to display a subset of EViews object types, a “–” will be displayed in the description at the top of the workfile window.
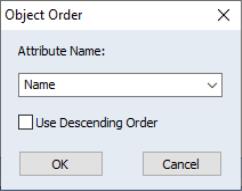
Changing the Display Order
You may change the order in which objects in the workfile are displayed by selecting View/ or clicking on the in the upper right hand portion of the workfile window.
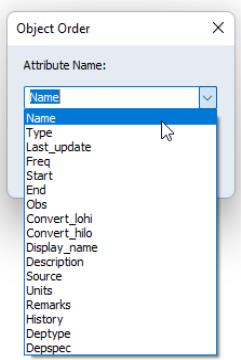
EViews will display the dialog, prompting you for the attribute you wish to use for sorting, and whether to use ascending or descending order.
There is a long is of attributes that you may use to determine order, including, among others, , , , :
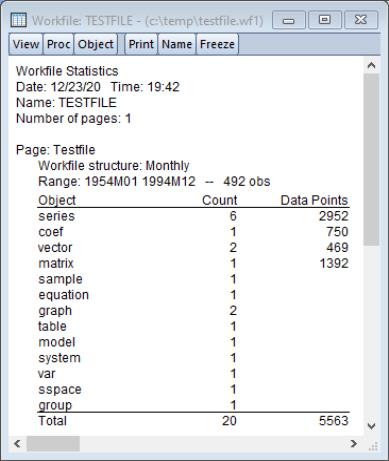
Workfile Summary View
In place of the directory display, you can display a summary view for your workfile. If you select this view, the display will change to provide a description of the current workfile structure, along with a list of the types and numbers of the various objects in each of the pages of the workfile.
To select the summary view, click on in the main workfile menu or toolbar. Here we see the display for a first page of a two page workfile.
To return to the directory display view, select .